Developer Guide
- Acknowledgements
- Setting up, getting started
- Design
- Implementation
- Documentation, logging, testing, configuration, dev-ops
- Appendix: Requirements
-
Appendix: Instructions for manual testing
- Launch and shutdown
- Saving the data
- Adding a module
- Editing a module
- Deleting a module
- Adding a student
- Editing a student
- Deleting a student
- Finding a student
- Going to the homepage
- Adding a task
- Editing a task
- Deleting a task
- Marking a task as done
- Marking a task as undone
- Clearing all information
- Exiting the application
- Appendix: Effort
Acknowledgements
- This project is evolved from the AddressBook Level 3 (AB3), a desktop app for managing contacts, optimized for use via a Command Line Interface (CLI).
Setting up, getting started
Refer to the guide Setting up and getting started.
Design
.puml files used to create diagrams in this document can be found in the diagrams folder. Refer to the PlantUML Tutorial at se-edu/guides to learn how to create and edit diagrams.
Architecture
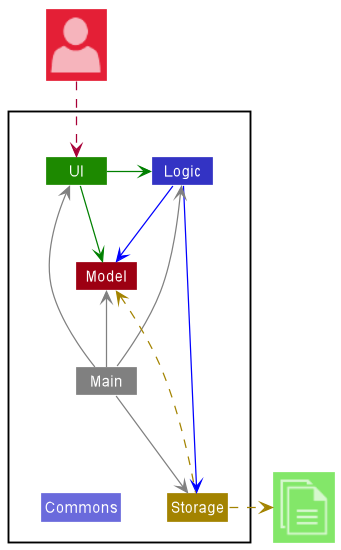
The Architecture Diagram given above explains the high-level design of the App.
Given below is a quick overview of main components and how they interact with each other.
Main components of the architecture
Main has two classes called Main and MainApp. It is responsible for,
- At app launch: Initializes the components in the correct sequence, and connects them up with each other.
- At shut down: Shuts down the components and invokes cleanup methods where necessary.
Commons represents a collection of classes used by multiple other components.
The rest of the App consists of four components.
-
UI: The UI of the App. -
Logic: The command executor. -
Model: Holds the data of the App in memory. -
Storage: Reads data from, and writes data to, the hard disk.
How the architecture components interact with each other
The Sequence Diagram below shows how the components interact with each other for the scenario where the user issues the command delete module m/CS2103.
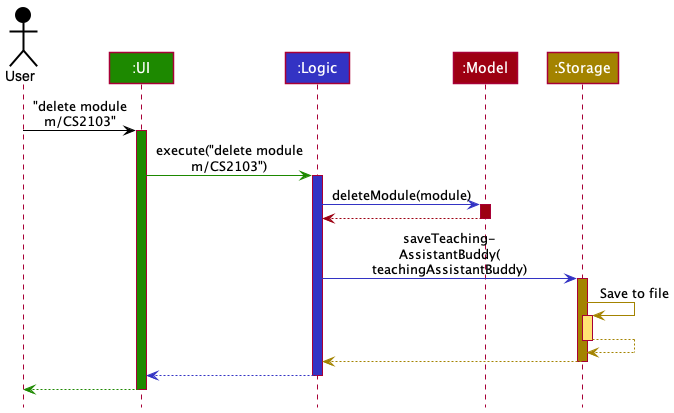
Each of the four main components (also shown in the diagram above),
- defines its API in an
interfacewith the same name as the Component. - implements its functionality using a concrete
{Component Name}Managerclass (which follows the corresponding APIinterfacementioned in the previous point.
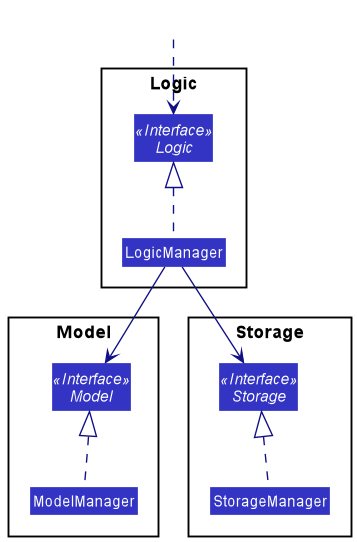
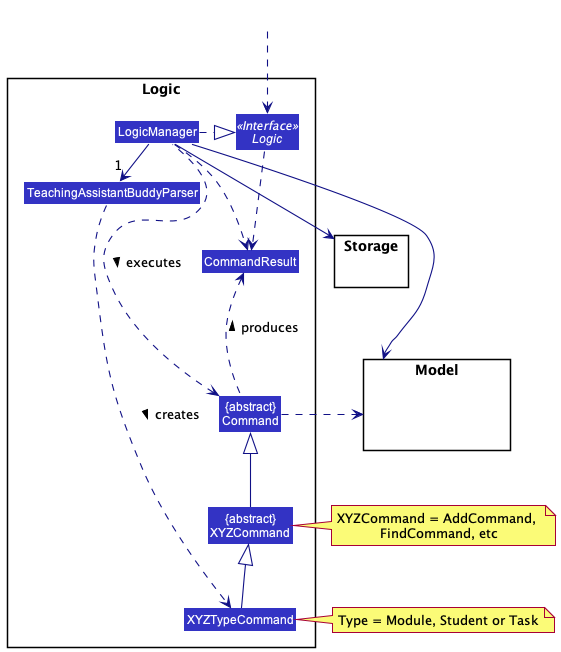
For example, the Logic component defines its API in the Logic.java interface and implements its functionality using the LogicManager.java class which follows the Logic interface. Other components interact with a given component through its interface rather than the concrete class (reason: to prevent outside component’s being coupled to the implementation of a component), as illustrated in the (partial) class diagram below.
The sections below give more details of each component.
UI component
The API of this component is specified in Ui.java
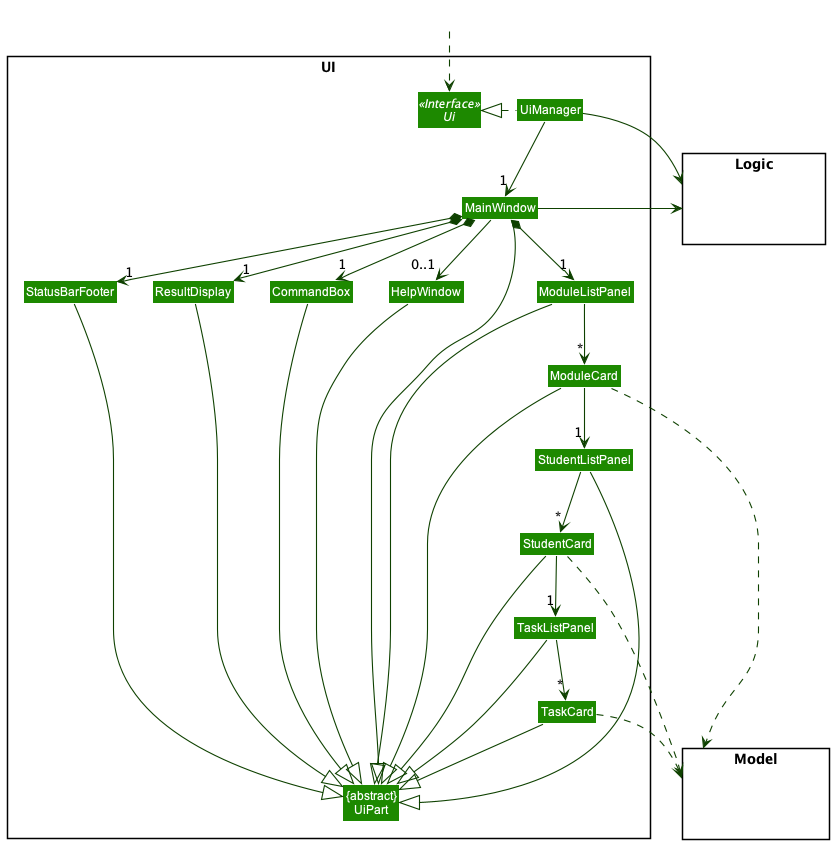
The UI consists of a MainWindow that is made up of parts e.g.CommandBox, ResultDisplay, ModuleListPanel, StatusBarFooter etc. All these, including the MainWindow, inherit from the abstract UiPart class which captures the commonalities between classes that represent parts of the visible GUI.
The UI component uses the JavaFx UI framework. The layout of these UI parts are defined in matching .fxml files that are in the src/main/resources/view folder. For example, the layout of the MainWindow is specified in MainWindow.fxml
The UI component,
- executes user commands using the
Logiccomponent. - listens for changes to
Modeldata so that the UI can be updated with the modified data. - keeps a reference to the
Logiccomponent, because theUIrelies on theLogicto execute commands. - depends on some classes in the
Modelcomponent, as it displaysModuleobject residing in theModel.
Logic component
API : Logic.java
Here’s a (partial) class diagram of the Logic component:
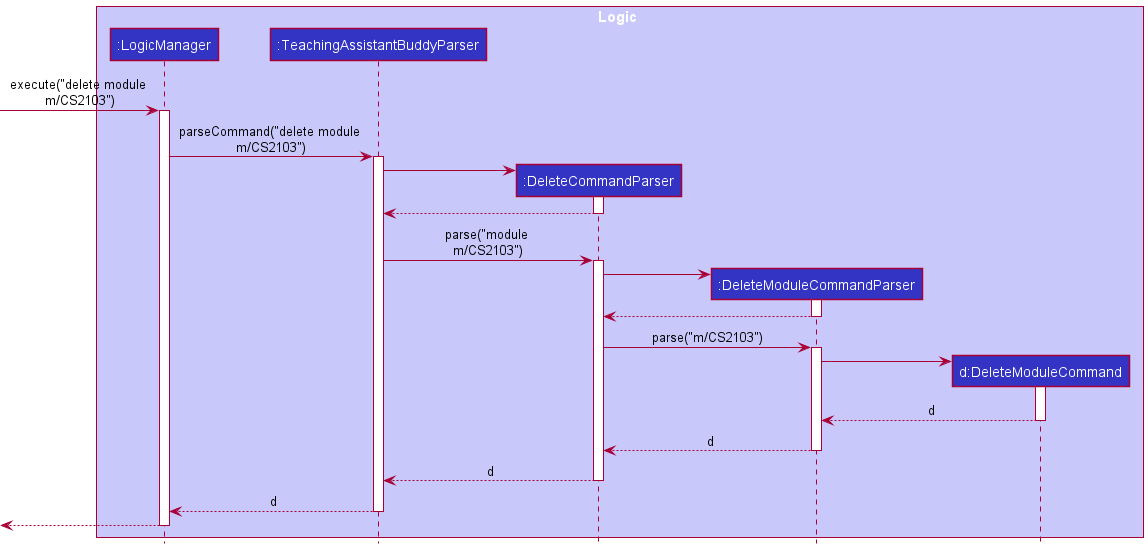
How the Logic component works:
- When the
Logicis called upon to executedelete module m/CS2103, it uses theTeachingAssistantBuddyParserclass to parse the user command. - The
TeachingAssistantBuddyParserparses the first command worddelete, and pass the rest of the input to aDeleteCommandParser. - The
DeleteCommandParserthen figures out the type of object to delete, in this case aModuleobject as indicated bymodule. - The
DeleteModuleCommandParserwill wrap the module name in aModuleNameobject and pass it into aDeleteModuleCommand. - This results in a
DeleteModuleCommandobject (which is a subclass ofDeleteCommand), which is executed by theLogic Manager.
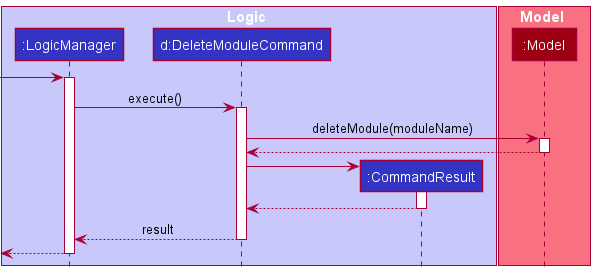
- The
DeleteModuleCommandcommunicates with theModelwhen it is executed. - The
Modelwill look for aModulewith the specifiedModuleNameand delete it. - The result of the command execution is encapsulated as a
CommandResultobject which is returned fromLogic.
Here are the other classes in Logic (omitted from the class diagram above) that are used for parsing a user command:
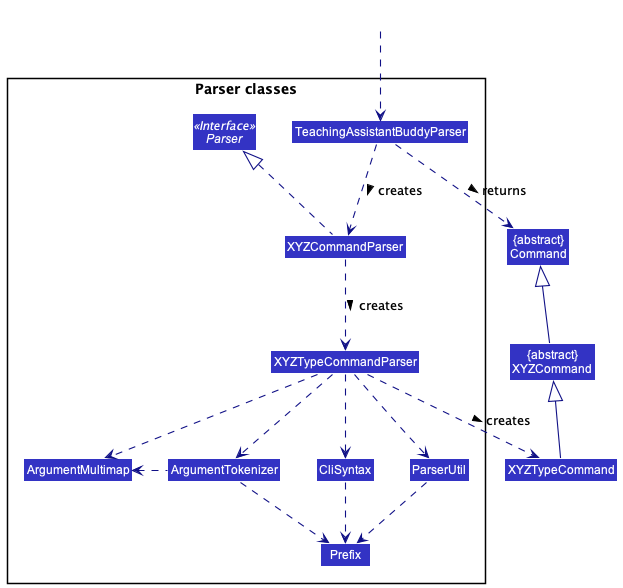
How the parsing works:
- When called upon to parse a user command, the
TeachingAssistantBuddyParserclass creates anXYZTypeCommandParser(XYZis a placeholder for the specific command name e.g.,Add,Edit.Typeis a placeholer for the type of object to be operated on e.g.,Module,StudentorTask) which uses the other classes shown above to parse the user command and create aXYZTypeCommandobject (e.g.,AddModuleCommand) which theTeachingAssistantBuddyParserreturns back as aCommandobject. - All
XYZTypeCommandParserclasses (e.g.,AddModuleCommandParser,DeleteModuleCommandParser, …) inherit from theParserinterface so that they can be treated similarly where possible e.g, during testing.
Model component
API : Model.java
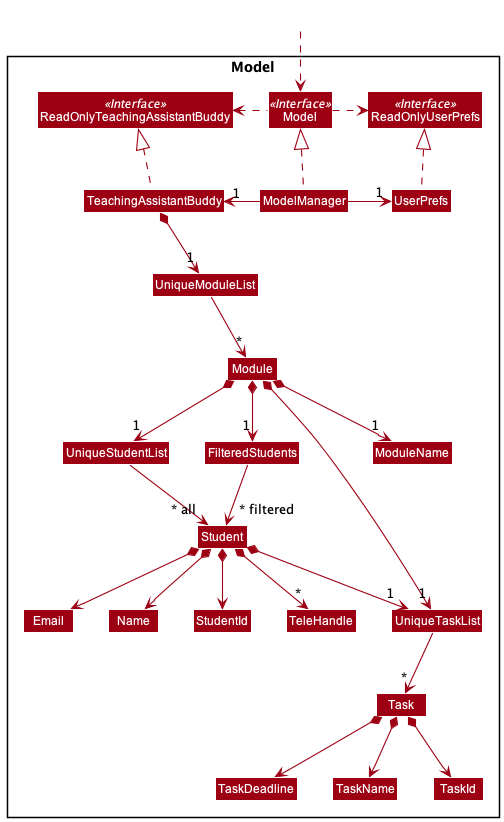
The Model component,
- stores the Teaching Assistant Buddy data i.e., all
Moduleobjects (which are contained in aUniqueModuleListobject). - stores the currently ‘selected’
Moduleobjects which is exposed to outsiders as an unmodifiableObservableList<Module>that can be ‘observed’ e.g. the UI can be bound to this list so that the UI automatically updates when the data in the list change.Modulealso stores a unique student list and a filtered student list (used for example, when searching for a specificStudent). EachStudenthas a unique task list. - stores a
UserPrefobject that represents the user’s preferences. This is exposed to the outside as aReadOnlyUserPrefobjects. - does not depend on any of the other three components (as the
Modelrepresents data entities of the domain, they should make sense on their own without depending on other components)
Storage component
API : Storage.java
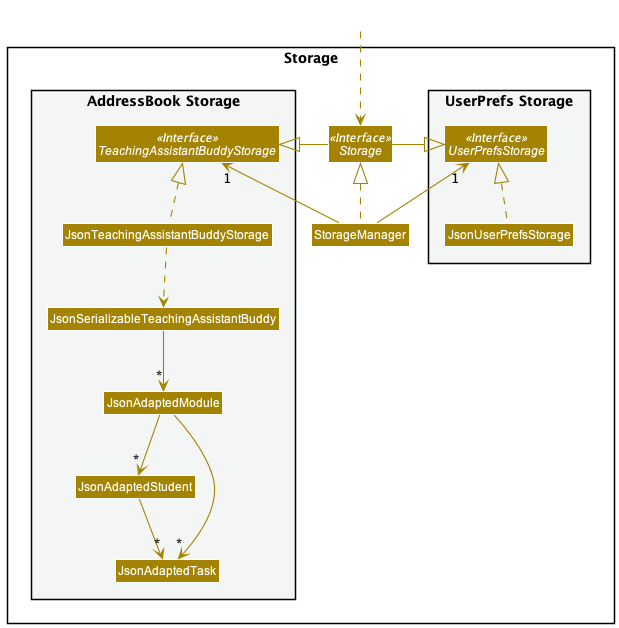
The Storage component,
- can save both teaching assistant buddy data and user preference data in json format, and read them back into corresponding objects.
- inherits from both
TeachingAssistantBuddyandUserPrefStorage, which means it can be treated as either one (if only the functionality of only one is needed). - depends on some classes in the
Modelcomponent (because theStoragecomponent’s job is to save/retrieve objects that belong to theModel)
Common classes
Classes used by multiple components are in the seedu.address.commons package.
Implementation
This section describes some noteworthy details on how certain features are implemented.
Add Module
- When the
Logicis called upon to executeadd module m/CS2103, it uses theTeachingAssistantBuddyParserclass to parse the user command. - The
TeachingAssistantBuddyParserparses the first command wordadd, and pass the rest of the input to aAddCommandParser. - The
AddCommandParserthen figures out the type of object to add, in this case aModuleobject as indicated bymodule. - The
AddModuleCommandParserwill wrap the module name in aModuleNameobject and pass it into aAddModuleCommand. - This results in a
AddModuleCommandobject (which is a subclass ofAddCommand), which is executed by theLogic Manager.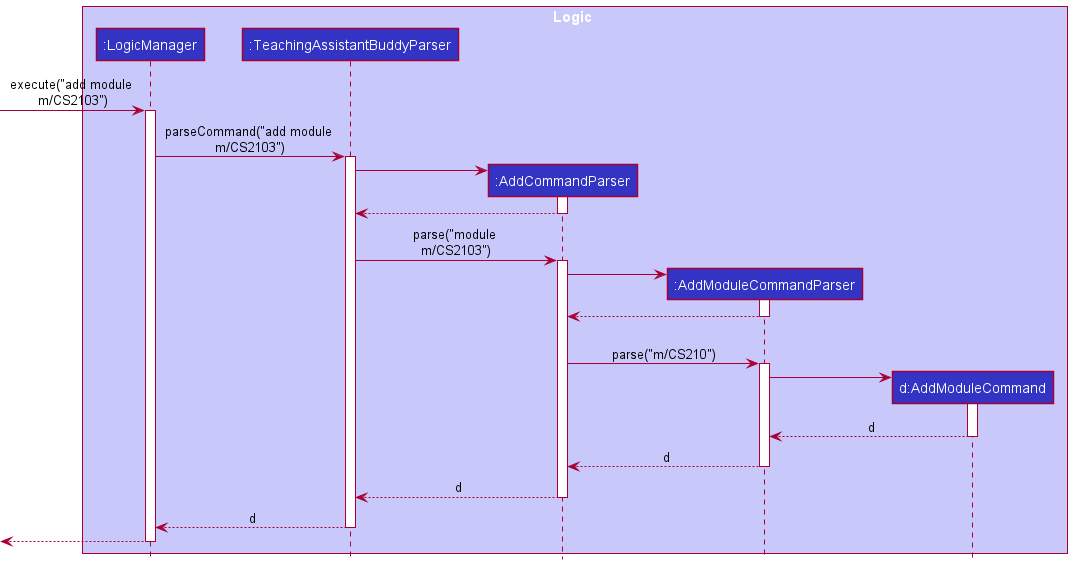
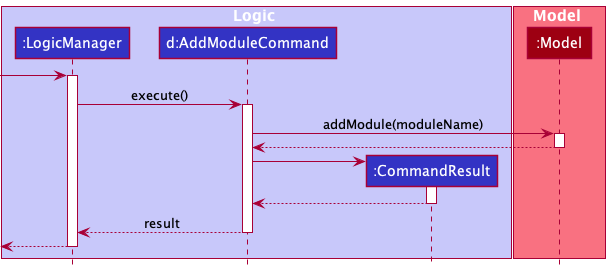
- The
AddModuleCommandcommunicates with theModelwhen it is executed. - The
Modelwill add a newModulewith the newModuleName. - The result of the command execution is encapsulated as a
CommandResultobject which is returned fromLogic.
Edit Module
- When the
Logicis called upon to executeedit module m/CS2103 mn/CS2105, it uses theTeachingAssistantBuddyParserclass to parse the user command. - The
TeachingAssistantBuddyParserparses the first command wordedit, and pass the rest of the input to aEditCommandParser. - The
EditCommandParserthen figures out the type of object to edit, in this case aModuleobject as indicated bymodule. - The
EditModuleCommandParserwill parse the tokensm/<old module name>andmn/<new module name>. -
EditModuleCommandParserwill also create aEditModuleCommandand the module to edit, which is executed by theLogicManager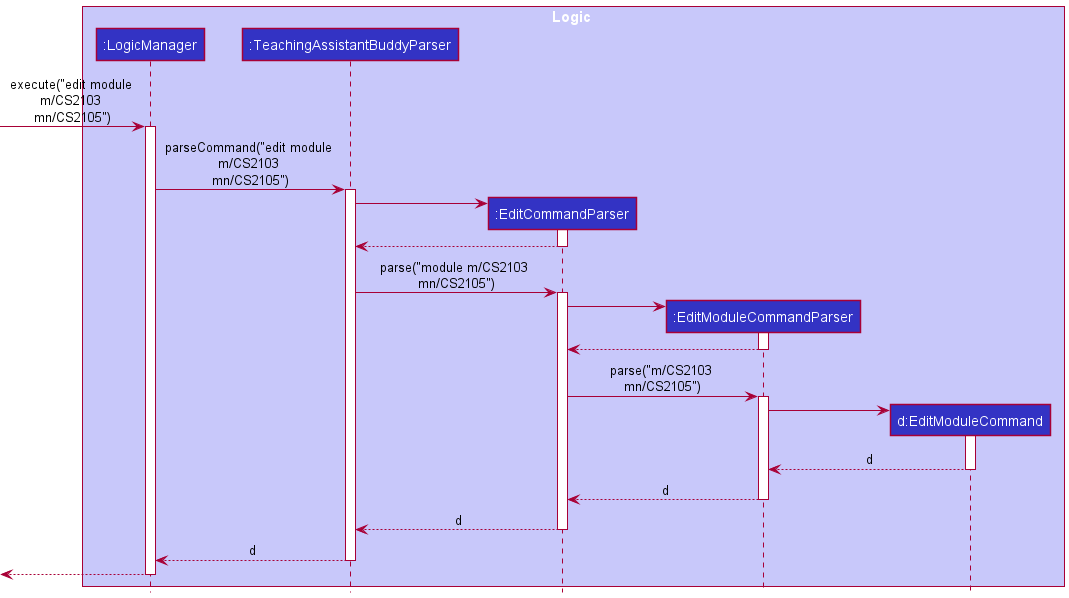
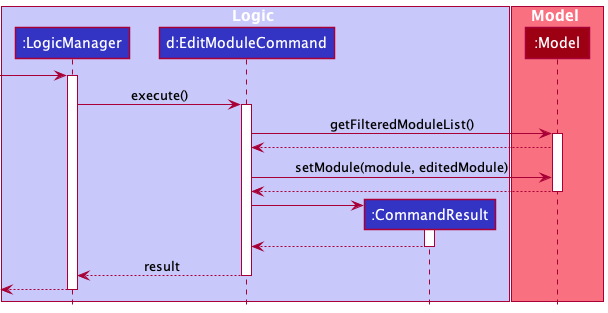
- The
EditModuleCommandcommunicates with theModelwhen it is executed. - The
EditModuleCommandwill look for aModulewith the specified name and edit the name after getting a list of modules fromModel. - The
Modelwill then cahnge the old module to the newly edited module. - The result of the command execution is encapsulated as a
CommandResultobject which is returned fromLogic.
Add Student
- When the
Logicis called upon to executeadd student m/CS2103 i/A1234567A n/Amy bee t/@amybee e/amybee@gmail.com, it uses theTeachingAssistantBuddyParserclass to parse the user command. (refer to the diagram for Add Module) - The
TeachingAssistantBuddyParserparses the first command wordadd, and pass the rest of the input to aAddCommandParser. - The
AddCommandParserthen figures out the type of object to add, in this case aStudentobject as indicated bystudent. - The
AddStudentCommandParserwill wrap the module name in aModuleNameobject and the student’s information in aStudentobject and pass it into aAddStudentCommand. - This results in a
AddStudentCommandobject (which is a subclass ofAddCommand), which is executed by theLogic Manager. - The
AddStudentCommandcommunicates with theModelwhen it is executed. - The
Modelwill look for aModulewith the specifiedModuleName. - The
Modulewith the specifiedModuleNamewill then add the newStudentobject to its student list. - The result of the command execution is encapsulated as a
CommandResultobject which is returned fromLogic.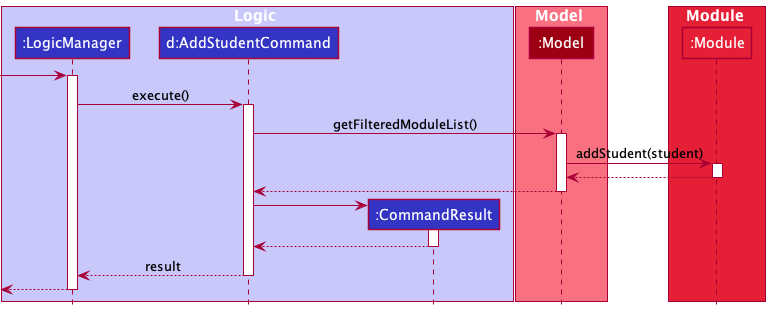
Delete Student
- When the
Logicis called upon to executedelete student m/CS2103 i/A1234567A, it uses theTeachingAssistantBuddyParserclass to parse the user command. (refer to the diagram for Delete Module under Design > Logic component) - The
TeachingAssistantBuddyParserparses the first command worddelete, and pass the rest of the input to aDeleteCommandParser. - The
DeleteCommandParserthen figures out the type of object to delete, in this case aStudentobject as indicated bystudent. - The
DeleteStudentCommandParserwill wrap the module name in aModuleNameobject and the student ID in aStudentIdobject and pass them into aDeleteStudentCommand. - This results in a
DeleteStudentCommandobject (which is a subclass ofDeleteCommand), which is executed by theLogic Manager. - The
DeleteStudentCommandcommunicates with theModelwhen it is executed. - The
Modelwill look for aModulewith the specifiedModuleName. - The
Modulewith the specifiedModuleNamewill then look for the student with the specifiedStudentIdand delete the student. - The result of the command execution is encapsulated as a
CommandResultobject which is returned fromLogic.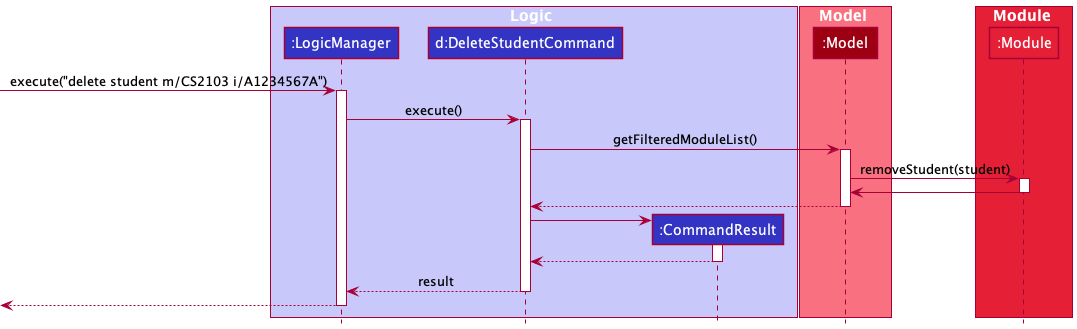
Edit Student
- When
Logicis called upon to execute the user inputedit student m/CS2103 i/A1234567A n/Amy Lee, it uses theTeachingAssistantBuddyParserclass to parse the user command. (refer to the diagram for Edit Module) -
TeachingAssistantBuddyParserparses the first command wordedit, and pass the rest of the input toEditCommandParser. - The
EditCommandParserthen figures out the type of object to edit, in this case aStudentobject as indicated bystudent. - The
EditStudentCommandParserwill then parse the tokens,m/CS2103,i/A1234567Aandn/Amy Leein this case, to determine the moduleName (CS2103in this case), and to create anEditStudentDescriptorwith the student IDA1234567Aand the nameAmy Lee, and pass theseModuleNameandEditStudentDescriptorobjects into anEditStudentCommand. - This results in a
EditStudentCommandobject (which is a subclass ofEditCommand), which is executed by theLogic Manager. - The
EditStudentCommandcommunicates with theModelwhen it is executed. - The
Modelwill look for theStudentwith the specified student id,A1234567Ain this case, inside theModulespecified by the module name,CS2103in this case, and then replacing the old editable fields (such as student name, tele handle and email) of thatStudentusing any optionally provided new fields. - The result of the command execution is encapsulated as a
CommandResultobject which is returned fromLogic.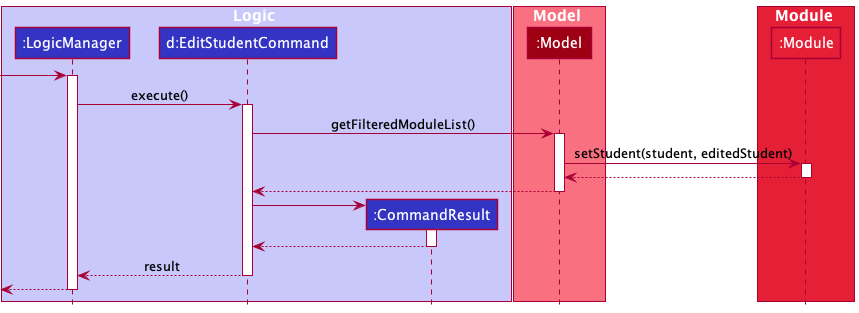
Find Student
- When the
Logicis called upon to executefind m/CS2103 i/A1234567A, it uses theTeachingAssistantBuddyParserclass to parse the user command. (refer to the diagram under Design > Logic component) - The
TeachingAssistantBuddyParserparses the first command wordfind, and pass the rest of the input to aFindStudentCommandParser. - The
FindStudentCommandParserwill wrap the module name in aModuleNameobject and the student’s ID in aStudentIdobject and pass it into aFindStudentCommand. - This results in a
FindStudentCommandobject, which is executed by theLogic Manager. - The
FindStudentCommandcommunicates with theModelwhen it is executed. - The
Modelwill look for aModulewith the specifiedModuleName. - The
Modulewith the specifiedModuleNamewill then look for theStudentwith the specifiedStudentIdand update the module’s filtered student’s list to only contain this specific student. - The result of the command execution is encapsulated as a
CommandResultobject which is returned fromLogic.
Add Task
- When
Logicis called upon to execute the user inputadd task m/CS2103 ti/T1 a/assignment1 d/2021-10-20, it uses theTeachingAssistantBuddyParserclass to parse the user command. (refer to the diagram for Add Module) -
TeachingAssistantBuddyParserparses the first command wordadd, and pass the rest of the input toAddCommandParser. -
AddCommandParserthen figures out the type of object to add, in this case ataskobject as indicated by the keywordtask, and pass the rest of the arguments toAddTaskCommandParser. -
AddTaskCommandParserwill create amoduleNameobject, ataskNameobject, and ataskDeadlineobject based on the input arguments. They are then passed toAddTaskCommand. - This results in a
AddTaskCommandobject (which is a subclass ofAddCommand), which is executed by theLogic Manager. - The
AddTaskCommandcommunicates with theModelwhen it is executed. - The
Modelwill add a newTaskwith the newtaskNameunder theModulewith thatmoduleName. TheTaskwill also be added to all theStudents under the specifiedModule. - The result of the command execution is encapsulated as a
CommandResultobject which is returned fromLogic.
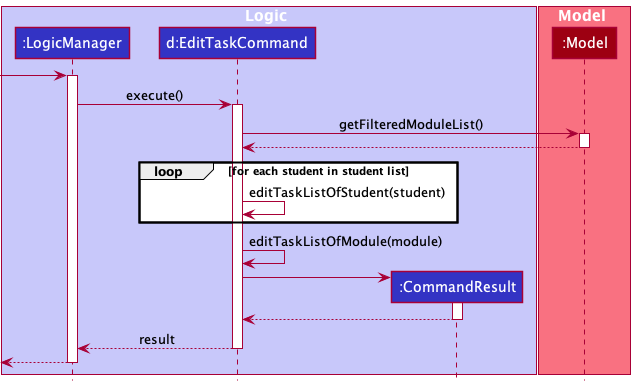
Edit Task
- When
Logicis called upon to execute the user inputedit task m/CS2103 ti/T1 a/final exam, it uses theTeachingAssistantBuddyParserclass to parse the user command. (refer to the diagram for Edit Module) -
TeachingAssistantBuddyParserparses the first command wordedit, and pass the rest of the input toEditCommandParser. - The
EditCommandParserthen figures out the type of object to edit, in this case aTaskobject as indicated bytask. - The
EditTaskCommandParserwill then parse the tokens,m/CS2103andti/T1in this case, to determine the module (CS2103in this case), and the taskId (T1in this case) of the task that is being edited, and pass the rest of the tokens toEditTaskCommand. - The
EditTaskCommandcreate anEditTaskDescriptorobject (defined in EditTaskCommand), using the givenmoduleNameobject,taskIdobject, and any other tokens passed fromEditTaskCommandParserrepresenting the newly updated fields of the task object. - This results in a
EditTaskCommandobject (which is a subclass ofEditCommand), which is executed by theLogic Manager. - The
EditTaskCommandcommunicates with theModelwhen it is executed. - The
EditTaskCommandwill get a list of modules fromModeland look for the specifiedModule. - The
EditTaskCommandwill look for theTaskwith the specified task id,T1in this case, for everyStudentin the student list underModulespecified by the module name,CS2103in this case, and replacing the old editable fields of (such as task name, task deadline) of thatTaskusing any optionally provided new fields. - The result of the command execution is encapsulated as a
CommandResultobject which is returned fromLogic.
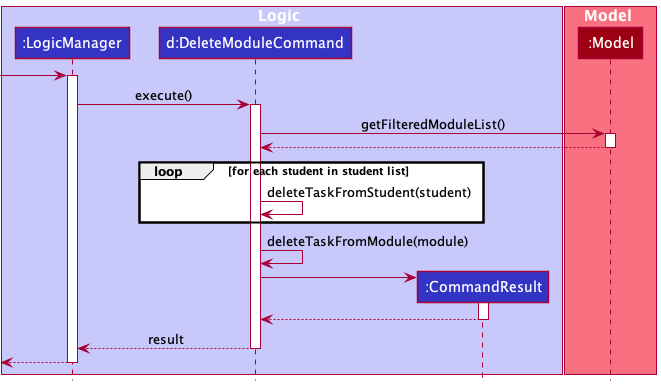
Delete Task
- When the
Logicis called upon to executedelete task m/CS2103 ti/T1, it uses theTeachingAssistantBuddyParserclass to parse the user command. (refer to the diagram for Delete Module under Design > Logic component) - The
TeachingAssistantBuddyParserparses the first command worddelete, and pass the rest of the input to aDeleteCommandParser. - The
DeleteTaskCommandParserthen figures out the type of object to delete, in this case aTaskobject as indicated bytask. - The
DeleteStudentCommandParserwill wrap the module name in aModuleNameobject and the task ID in aTaskIdobject and pass them into aDeleteTaskCommand. - This results in a
DeleteTaskCommandobject (which is a subclass ofDeleteCommand), which is executed by theLogic Manager. - The
DeleteTaskCommandcommunicates with theModelwhen it is executed. - The
DeleteTaskCommandwill get the current list of modules fromModel, and look for the specifiedModule. - The
Modulewith the specifiedModuleNamewill then look for the task with the specifiedTaskIdand delete the task. - The
Modulewill also iterate through itsStudentlist and delete the specifiedTaskfrom all the students. - The result of the command execution is encapsulated as a
CommandResultobject which is returned fromLogic.
Documentation, logging, testing, configuration, dev-ops
Appendix: Requirements
Product scope
Target user profile:
- is a tutor overseeing students for an academic module or subject
- has a need to manage a moderate to large number of students
- prefer desktop apps over other types
- can type fast
- prefers typing to mouse interactions
- is reasonably comfortable using CLI apps
Value proposition: manage students’ academic progress faster than a typical mouse/GUI driven app
User stories
Priorities: High (must have) - * * *, Medium (nice to have) - * *, Low (unlikely to have) - *
| Priority | As a … | I want to … | So that I can… |
|---|---|---|---|
* * * |
new user | add a student to a module | |
* * * |
new user | delete a student from a module | remove data that I no longer need |
* * * |
new user | edit a student’s information | change and update the student’s information easily |
* * * |
new user | get a student’s information | find and check a student’s progress easily |
* * * |
new user | create a new module | |
* * * |
new user | delete a module | remove data that I no longer need |
* * * |
new user | edit a module’s name | change and update the module’s name easily |
* * * |
new user | add task to a module | |
* * * |
new user | delete task from a module | remove data that I no longer need |
* * * |
new user | edit a task’s information | change and update information about the task easily |
* * * |
new user | mark a task as done | track my students’ progress |
* * * |
new user | mark a task as undone | track my students’ progress |
Use cases
(For all use cases below, the System is Teaching Assistant’s Buddy and the Actor is the user, unless specified otherwise)
Use case: Add a student to a module
MSS
- User requests to add a student to a module by listing down the module’s and student’s information
- System finds the module
-
System adds the student into the module’s student’s list
Use case ends.
Extensions
- 1a. Module is not found.
-
1a1. System shows an error message.
Use case ends.
-
- 1b. Student’s ID is already in the module student’s list.
-
1b1. System shows an error message.
Use case ends.
-
Use case: Delete a student from a module
MSS
- User requests to delete a specific student from a module in system
- System finds the module
-
System deletes the student from the module
Use case ends.
Extensions
- 1a. Module is not found.
-
1a1. System shows an error message.
Use case ends.
-
- 1b. Student’s ID is not found in the module’s student’s list.
-
1b1. System shows an error message.
Use case ends.
-
Use case: Edit a student’s information
MSS
- User requests to edit a specific student’s information in a module
- System finds the module
- System finds the student with the specified student ID
-
System edits the student’s information
Use case ends.
Extensions
- 1a. Module is not found.
-
1a1. System shows an error message.
Use case ends.
-
- 1b. Student’s ID is not found in the module’s student’s list.
-
1b1. System shows an error message.
Use case ends.
-
Use case: Get a student’s information
MSS
- User requests to find a student in a module and get his/her information
- System finds the module
-
System finds the student and shows his/her information
Use case ends.
Extensions
- 1a. Module is not found.
-
1a1. System shows an error message.
Use case ends.
-
- 1b. Student is not found.
-
1b1. System shows an error message.
Use case ends.
-
Use case: Create a new module
MSS
- User requests to create a new module in System
-
System creates the module
Use case ends.
Extensions
- 1a. Module is already in System.
-
1a1. System shows an error message.
Use case ends.
-
Use case: Delete a module
MSS
- User requests to delete a module in System
-
System deletes the module
Use case ends.
Extensions
- 1a. Module is not found.
-
1a1. System shows an error message.
Use case ends.
-
Use case: Edit a module’s name
MSS
- User requests to edit a module’s name
- System finds the module
-
System edits the module’s name
Use case ends.
Extensions
- 1a. Module is not found.
-
1a1. System shows an error message.
Use case ends.
-
Use case: Add task to a module
MSS
- User requests to add a task to a module in System
-
System adds the task to the module and its students
Use case ends.
Extensions
- 1a. Task is not found.
-
1a1. System shows an error message.
Use case ends.
-
- 1b. Module is not found.
-
1b1. System shows an error message.
Use case ends.
-
Use case: Delete task from a module
MSS
- User requests to delete a task from a module in System
-
System deletes the task from the module and its students
Use case ends.
Extensions
- 1a. Task is not found.
-
1a1. System shows an error message.
Use case ends.
-
- 1b. Module is not found.
-
1b1. System shows an error message.
Use case ends.
-
Use case: Mark task as done
MSS
- User requests to mark a task of a student in a module as done
-
System marks the task as done
Use case ends.
Extensions
- 1a. Module is not found.
-
1a1. System shows an error message.
Use case ends.
-
- 1b. Student is not found.
-
1b1. System shows an error message.
Use case ends.
-
- 1c. Task is not found.
-
1c1. System shows an error message.
Use case ends.
-
Use case: Mark task as not done
MSS
- User requests to mark a task of a student in a module as not done
-
System marks the task as not done
Use case ends.
Extensions
- 1a. Module is not found.
-
1a1. System shows an error message.
Use case ends.
-
- 1b. Student is not found.
-
1b1. System shows an error message.
Use case ends.
-
- 1c. Task is not found.
-
1c1. System shows an error message.
Use case ends.
-
Use case: Edit a task’s information
MSS
- User requests to edit a task’s information
- System finds the module and students that have the specified task
-
System edits the task’s information
Use case ends.
Extensions
- 1a. Module is not found.
-
1a1. System shows an error message.
Use case ends.
-
- 1b. Task is not found.
-
1b1. System shows an error message.
Use case ends.
-
Non-Functional Requirements
- Should work on any mainstream OS as long as it has Java
11or above installed. - Should be able to respond to a user command within 2 seconds.
- A user with above average typing speed for regular English text (i.e. not code, not system admin commands) should be able to accomplish most of the tasks faster using commands than using the mouse.
- Should be able to handle up to 100 students without significant lag in response time.
Glossary
- Mainstream OS: Windows, Linux, Unix, OS-X
- Private contact detail: A contact detail that is not meant to be shared with others
- Module: An academic module or subject that is frequently found in universities and institutes of higher learning
Appendix: Instructions for manual testing
Given below are instructions to test the app manually.
Launch and shutdown
-
Initial launch of the TAB application.
-
Download the jar file and copy into an empty folder.
-
Double-click the jar file. Expected: Shows the GUI with a set of sample contacts. The window size may not be optimal.
-
-
Shutting down the TAB application.
- Close the application using the close button in the application window, or using the exit command as listed in a section below.
-
Dealing with missing/corrupted data files.
- When the data file is missing or not in the correct format, the application will be starting with an empty TeachingAssistantBuddy.
Saving the data
- TAB data are saved in the hard disk automatically after any command that changes the data. There is no need to save manually.
Adding a module
-
Adding a module while all modules are being shown.
-
Prerequisites: List all modules using the
homecommand. TAB can be empty. -
Test case:
add module m/CS2105
Expected: TheModulewith the nameCS2105is added to the list of modules. -
Test case:
add module m/ALREADY_EXISTING_MODULE
Expected: NoModuleis added. Error details shown in the status message. -
Other incorrect add module commands to try:
add module,add subject,...
Expected: Similar to previous.
-
Editing a module
-
Editing a module while all modules are being shown.
-
Prerequisites: List all modules using the
homecommand. At least 1Moduleis in the TAB. -
Test case:
edit module m/CS2100 mn/CS2106
Expected: TheModulewith the nameCS2100is edited to have the nameCS2106. -
Test case:
edit module m/NON_EXISTENT_MODULE mn/NEW_MODULE_NAME
Expected: NoModuleis deleted. Error details shown in the status message. -
Other incorrect edit module commands to try:
edit module,edit lesson,...
Expected: Similar to previous.
-
Deleting a module
-
Deleting a module while all modules are being shown.
-
Prerequisites: List all modules using the
homecommand. At least 1Moduleis in the TAB. -
Test case:
delete module m/CS2103
Expected: TheModulewith the nameCS2103is deleted from the list of modules. -
Test case:
delete module m/NON_EXISTENT_MODULE
Expected: NoModuleis deleted. Error details shown in the status message. -
Other incorrect delete module commands to try:
delete module,delete tutor,...
Expected: Similar to previous.
-
Adding a student
-
Adding a student to a module while all modules are being shown.
-
Prerequisites: List all modules using the
homecommand. At least 1Moduleis in the TAB. -
Test case:
add student m/CS2103 i/A0123456A n/John Doe t/@johndoe e/john.doe@u.nus.edu
Expected: TheStudentwith the student idA0123456Ais added to theModuleCS2103. -
Test case:
add student m/NON_EXISTENT_MODULE i/A0123456A n/John Doe t/@johndoe e/john.doe@u.nus.edu
Expected: NoStudentis added. Error details shown in the status message. -
Other incorrect add student commands to try:
add student i/A0123456A n/John Doe,add tutee m/CS2103 i/A0123456A,...
Expected: Similar to previous.
-
Editing a student
-
Editing a student while all modules are being shown.
-
Prerequisites: List all modules using the
homecommand. At least 1Moduleis in the TAB and thatModulehas at least 1Student. -
Test case:
edit student m/CS2103 i/A0123456A n/John Wick
Expected: TheStudentinModuleCS2103with the student idA0123456Ais edited to have the nameJohn Wick. -
Test case:
edit student m/CS2103 i/NON_EXISTENT_STUDENT_ID n/Johnny English
Expected: NoStudentis deleted. Error details shown in the status message. -
Other incorrect edit student commands to try:
edit student,edit agent,...
Expected: Similar to previous.
-
Deleting a student
-
Deleting a student while all modules are being shown.
-
Prerequisites: List all modules using the
homecommand. At least 1Moduleis in the TAB and thatModulehas at least 1Student. -
Test case:
delete student m/CS2103 i/A0123456A
Expected: TheStudentwith the student idA0123456Ais deleted from theModuleCS2103. -
Test case:
delete student m/NON_EXISTENT_STUDENT_ID
Expected: NoStudentis deleted. Error details shown in the status message. -
Other incorrect delete student commands to try:
delete student,delete person i/A0123456A,...
Expected: Similar to previous.
-
Finding a student
-
Finding the information of a specific student in a specific module.
-
Prerequisites: List all modules using the
homecommand. At least 1Moduleis in the list and thatModulecontains at least 1Student. -
Test case:
find m/CS2103 i/A1234567A
Expected: TheStudentwith student idA1234567Ain theModuleCS2103will be chosen and displayed in TAB. -
Test case:
find m/CS2103 i/NON_EXISTING_STUDENT_ID
Expected: NoStudentwill be chosen and displayed in TAB. Error details shown in the status message. -
Other incorrect find commands to try:
lookup,search,...
Expected: Similar to previous.
-
Going to the homepage
-
Going to the homepage of TAB from anywhere in the application.
-
Prerequisites: The TAB application is running.
-
Test case:
home
Expected: The home page of TAB will be shown, along with all the data currently in TAB. -
Other incorrect home commands to try:
list,back,...
Expected: Similar to previous.
-
Adding a task
-
Adding a task to a module (and all its students) while all modules are being shown.
-
Prerequisites: List all modules using the
homecommand. At least 1Moduleis in the TAB. The task will still be added if there are noStudents in theModule, but the change will only be visible after aStudenthas been added. -
Test case:
add task m/CS2103 ti/T10 a/assignment1 d/2021-10-12
Expected: TheTaskwith the task idT10, nameassignment1and the deadlineTue, Oct 12 2021is added to theModuleCS2103and all theStudentsin that module. -
Test case:
add task m/NON_EXISTENT_MODULE ti/T10 a/assignment1 d/2021-10-12
Expected: NoTaskis added. Error details shown in the status message. -
Other incorrect add task commands to try:
add task m/CS2103 a/task with no id,add assignment,...
Expected: Similar to previous.
-
Editing a task
-
Editing a task of a module (and all its students) while all modules are being shown.
-
Prerequisites: List all modules using the
homecommand. At least 1Moduleis in the TAB and thatModulehas at least 1Task. The task will still be edited if there are noStudents in theModule, but the change will only be visible after aStudenthas been added. -
Test case:
edit task m/CS2103 ti/T10 a/Final exam d/2021-11-23
Expected: TheTaskinModuleCS2103with the task idT10is edited to have the nameFinal examand deadlineTue, Nov 23 2021. -
Test case:
edit task m/CS2103 ti/NON_EXISTENT_TASK_ID a/Practical exam
Expected: NoTaskis deleted. Error details shown in the status message. -
Other incorrect edit task commands to try:
edit exam,edit task m/NON_EXISTENT_MODULE,...
Expected: Similar to previous.
-
Deleting a task
-
Deleting a task from a module (and from all its students) while all modules are being shown.
-
Prerequisites: List all modules using the
homecommand. At least 1Moduleis in the TAB and thatModulehas at lest 1Task. The task will still be deleted if there are noStudents in theModule, but the change will only be visible after aStudenthas been added. -
Test case:
delete task m/CS2103 ti/T1
Expected: TheTaskwith the task idT1is deleted from theModuleCS2103. -
Test case:
delete task m/NON_EXISTENT_MODULE
Expected: NoTaskis deleted. Error details shown in the status message. -
Other incorrect delete task commands to try:
delete assignment,delete task m/CS2103 i/NON_EXISTENT_TASK_ID,...
Expected: Similar to previous.
-
Marking a task as done
-
Marking a task from a student in a particular module as done (
Completed).-
Prerequisites: List all modules using the
homecommand. TheTaskbeing marked done must belong to aStudentin aModulein TAB and theTaskmust beIncomplete. -
Test case:
mark done m/CS2103 i/A1234567A ti/T1
Expected: TheTaskwith the task idT1is marked asCompletedforStudentwith student idA1234567AofModuleCS2103. -
Test case:
mark done m/CS2103 i/A1234567A ti/T1(again, after the task is already marked asCompleted)
Expected: NoTaskis marked asCompleted. Error details shown in the status message. -
Other incorrect mark done commands to try:
mark finished,mark done m/NON_EXISTENT_MODULE i/NON_EXISTENT_STUDENT_ID ti/NON_EXISTENT_TASK_ID,...
Expected: Similar to previous.
-
Marking a task as undone
-
Marking a task from a student in a particular module as undone (
Incomplete).-
Prerequisites: List all modules using the
homecommand. TheTaskbeing marked undone must belong to aStudentin aModulein TAB and theTaskmust beCompleted. -
Test case:
mark undone m/CS2103 i/A1234567A ti/T1
Expected: TheTaskwith the task idT1is marked asIncompleteforStudentwith student idA1234567AofModuleCS2103. -
Test case:
mark undone m/CS2103 i/A1234567A ti/T1(again, after the task is already marked asIncomplete)
Expected: NoTaskis marked asCompleted. Error details shown in the status message. -
Other incorrect mark undone commands to try:
mark unfinished,mark undone m/NON_EXISTENT_MODULE i/NON_EXISTENT_STUDENT_ID ti/NON_EXISTENT_TASK_ID,...
Expected: Similar to previous.
-
Clearing all information
-
Clearing all information from TAB using the
clearcommand.-
Prerequisites: The TAB application is running.
-
Test case:
clear
Expected: All information in TAB will be cleared. If TAB has no information, the successful status message will still be shown. -
Other incorrect clear commands to try:
reset,refresh,...
Expected: Similar to previous.
-
Exiting the application
-
Exiting the application using the
exitcommand.-
Prerequisites: The TAB application is running.
-
Test case:
exit
Expected: The TAB application will exit. -
Other incorrect exit commands to try:
bye,quit,logout,...
Expected: The TAB application will not exit. Error details shown in ths status message
-
Appendix: Effort
With AB3 as the baseline of comparison, our project is much more demanding. AB3, as an address book application that manages contact details, has only one model which is a Person. For our project which is building a helper for teaching assistants, there are three models, namely, Modules, Students, and Tasks.
This created some problems when we were designing the UI, including how to arrange these three types of objects, and what their relationship would be. A meeting was held, during which we used Miro to come up with wireframes and prototypes and conducted discussions to finalise our design. Although it was harder to manage more than one type of object, we all embraced this challenge and successfully rendered a working product.
Another challenge we faced was more specific. When we added in students and tasks to TAB, tasks under some students were not shown. And this bug was inconsistent - sometimes we could not reproduce it even when following the exact steps. We initially considered it as a UI bug and wasn’t sure how to go about solving it. But we did not give up and leave it unattended. After much effort, one of us discovered that these missing tasks were not added to their corresponding students in time. Following this lead, another team member located to code that was causing this issue and fixed it. With hard work and perseverance, we managed to solve something previously thought of as unsolvable.
Other challenges we had included dealing with testing and storage. For many of us, this was the first time handling these aspects of coding. It was not easy, especially for those members who volunteered as trailblazers and set the standard for writing test cases and storage-related logic. Kudos to them!
Overall, this project posed many difficulties and challenges that we had to overcome. To many of us, this was the first collaborative software engineering project that involved facets that were once unfamiliar, such as testing, UI and storage. It would be an understatement to say that it was not easy. Nevertheless, we, together as a team, rose above all these obstacles and passed this trial of diligence, determination, resourcefulness, and teamwork.